Bundles allows you to group together services and sell them to your client for a set price, those services can then be redeemed at any time.
This is ideal for practitioners who might be offering a pre-purchase of multiple consultations such as a 5 Follow Up Bundle.
On this page:
- Important Information
- Create a Bundle
- Sell a Bundle
- Automated Email
- View Entitlements
- Book and Redeem an included service
- Patient Cancellations
- Provide invoices for clients who wish to claim for private health
For examples of how to use Bundles, click this link.
To watch a video demo - click this link.
Important Information
- The type of the inventory item in Step 1 MUST be set to Bundle, otherwise it cannot be selected when creating the bundle.
- If you are offering in person and online services, you must create separate bundles for each.
- An invoice for a bundle must be paid in full, part payments will not trigger entitlements.
- Currently Bundles are not available to purchase through your online booking page, you will need to publish it on your website using the public link as per step 5.2.
How to Create a Bundle
Step 1. The bundle must have an inventory item created first. Go to Inventory -> Items -> Add New. Add the name of your bundle to the inventory as below image. Select Save. The TYPE must be set to BUNDLE.
For example:
Item Name = e.g. 5 Follow Up Consultation Bundle
Category = Service (if only services, or something else appropriate).
Supplier = your business name
Tax Setting = as per your business
Manufacturer Code = can be anything appropriate
Cost = 0
Sell = e.g. $380
Type = Bundle

Step 2. To create a bundle, go to Inventory -> Bundles -> Add New
You can also view and edit existing Bundles here.

Step 3. Complete the following details:
- Name -> can be the same as billing item
- Billing Item -> Select Billing item created in step 1 (if not showing, go back and set type to Bundle).

Step 4. Click the Add Service from the bottom right -> select a service to include and quantity -> click Add Entitlement -> repeat for as many services are required -> Save

How to sell a Bundle
Step 5. There are two options to sell a bundle:
Option 1 - Manually invoicing the patient
Select, or create, a patient -> Create Invoice -> search for the bundle name -> add to invoice -> process FULL payment as per the normal process. Part payments will not trigger entitlements.
This option will NOT trigger the automated email in Step 6. -> you will need to manually send an email template using a content block.
Option 2 - Via the Bundle Public URL
To add the Bundle to your website you will need to copy the public link (as below) and add this to a landing page. For example, the public link can be connected to a "Buy Now" button -> The patient will be asked to process payment online via your integrated payment gateway. This will trigger the automated email in Step 6.
Please note: If the customer is not already a client, a new record will be saved for them in SimpleClinic.

Automated Email
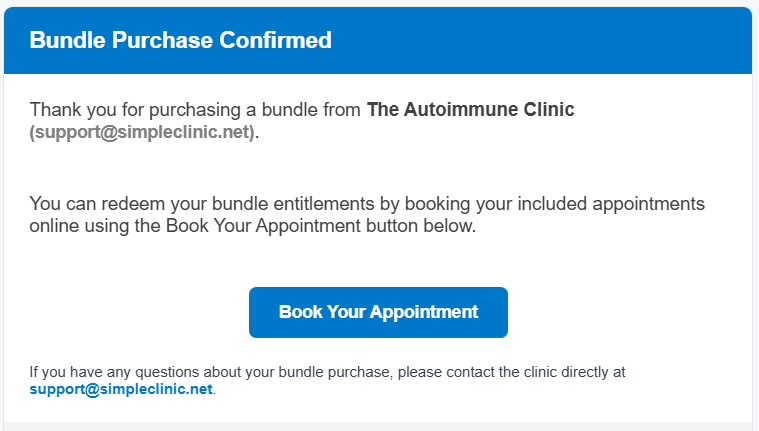
Step 6. Once a Bundle has been purchased online via the public URL, the following email will be sent to the patient so they can book their entitled service.
Please note:
- This is a standard automated email and the content is not configurable.
- This email is not sent if the bundle is purchased via an invoice created by the clinic.
- the Name in the email 'e.g. The Autoimmune Clinic' -> will be the name of your clinic under Business Setup -> Business Name
- The email contact in the email 'e.g. support@simpleclinic.net' -> will be the email set under Business Setup -> Email
How to view entitlements
Step 7. Once paid, there are two places that you can see what entitlements your clients have left to use:
- To view all patients: Go to Report Centre -> Consultation Reports -> Entitlement Report, this report will show patients entitlement balance for services they have a bundle entitlement to.
- To view individual patients: Go to the patient file -> Finances -> Entitlements (as below)
See Step 8 for the ways entitlements can be deducted.

How to book and redeem the included Service
Step 8.
Booking the service -
Included services can be booked by the patient booking the correct service via online booking or by the practitioner adding it to the diary.
- The client/practitioner must book for the exact service that they are entitled to for their booking to count against the bundle.
- If you have prepayment set on your consultations, the patient will not be asked to pay again if they book for one of their included services.
- For receipts for private health funds, refer to step 11
Redeeming the entitled service -
1. Patient Booking Online with prepayment -> The entitlement deduction occurs upon booking
An invoice for $0 will automatically appear on the patient record under the Finances tab. This invoice (1) shows when the appointment was booked, and (2) reduces the number of entitlements on the patient record, (3) can be used if one is required for private health claims, as per step 11.
2. Patient Booking Online with NO prepayment -> The entitlement deduction occurs once the appointment is invoiced and marked as paid.
Once a patient has been in for their consultation -> go to Diary -> select the appointment -> select Invoice Patient -> the invoice cost will be $0 if the correct service was selected -> add a payment of $0 -> OK. The entitlements will now have reduced by 1.
3. Practitioner booked the client in the Diary - The entitlement deduction occurs once the appointment is invoiced and marked as paid.
Once a patient has been in for their consultation -> go to Diary -> select the appointment -> select Invoice Patient -> the invoice cost will be $0 if the correct service was selected -> add a payment of $0 -> OK. The entitlements will now have reduced by 1.
Patient Cancellation
If a patient cancels their appointment and wants to book again at a later date, you must follow step 9 to adjust the entitlements to increase by 1.
Manually adjusting entitlements
If required, entitlements can be manually adjusted or added under the finances tab as below.
Step 9. Go to the patient record -> Finances tab -> select the arrow next to the entitlement to adjust -> enter the quantity (as below) -> OK.


Step 10. Go to the patient record -> Finances tab -> select the Add New button next to entitlements -> enter the details (as below) -> Save.
Please note that adding entitlements this way is not recommended practice and doing this will trigger an invoice being created automatically and hidden. It is best to add entitlements using an invoice for a bundle.


How to provide an invoice for claiming private health
Step 11. An invoice for the appointment is created when the patient books an appointment or can be invoiced at the time of the appointment (as per step 8), this invoice is set to $0 but can be edited as below to be used for private health:
- go to the patient record -> open the $0 invoice
- edit the unit price to what they paid for this service (the accurate proportion of the bundle price, not the full price of the service)
- open the link to view the invoice
- select download and save a PDF of the invoice
- email the PDF to patient
- hide this invoice so that it doesn’t affect income reporting, add a comment to explain why it was created and hidden.
Please note: Bundles are not available to purchase through your online booking page, you will need to publish the URL on your website using the public URL link as per step 5.2 above.