Inventory Management in SimpleClinic starts with ordering new inventory items from your supplier(s). It is in effect doing an initial 'stocktake'.
On this page:
- Important Information
- Create an Order
- Edit an Order
- Email an Order
- Receive an Order
- Xero Integration
Important Information
- only order products which you already have in the Items list, either feed items or items you have added yourself. If you want to order something new, you will first need to add the new item into your inventory.
- remove any duplicate items from your inventory, as you may record an order and stock for one version and then add the OTHER version of the item to an invoice. This will affect your stock on hand totals.
- remove any duplicate or incomplete suppliers, as these will cause orders to fail.
- If you have cloned a feed item, you need ensure the Manufacturer Code has been changed as the stock on hand report will match totals for items based on the Manufacturer Code even if they have been hidden from the inventory.
- Inventory Management menu and options are restricted to the clinic's admin staff, and not accessible to the practitioner users
- An order of 1 full bottle of herbal liquid from your supplier will convert to 500ml of stock in your inventory automatically, if the full 500ml bottles of a herbs are setup correctly as an ingredient.
- Adding a new line item to an order is required to validate the item is in the inventory items list.
Create an Order
Step 1. Select Inventory -> Orders menu from the left hand main menu -> select Create Order
From here you can also view previous orders and adjustments.
- Orders -> will show the Supplier name, e.g. Ariya Health Pty Ltd
- Adjustments -> will show no supplier name (as below)

Step 2. Select a supplier -> type into the Item field, then select the item to add it to the order -> enter the quantity -> click on Add Item -> repeat steps as needed (see next 3 images below). You must select a Supplier for your order to save.
The unit price and total price are updated for you based on the inventory item and cannot be edited here. The order is automatically saved as each item is added.
At this point, your inventory will not be updated by these entries until the order is marked as received.
See this article to add other suppliers.


Edit an Order
Step 3. Click on the product you want to edit, either the item name or quantity (as highlighted below) -> modify as needed -> this is automatically saved -> select the next item and continue or leave the screen.
The Unit Price and Total Price cannot be changed here. Unit Price comes from the inventory item cost price (this does not include GST) and the Total Price is calculated from the Unit Price x Quantity.

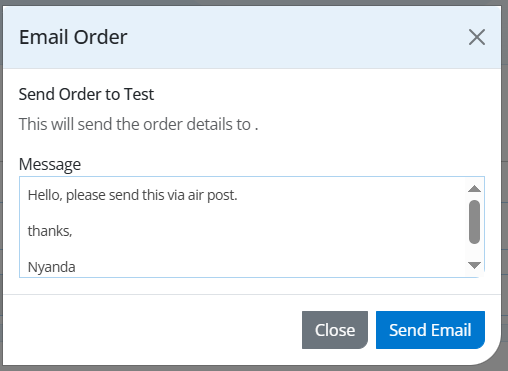
Email an Order
Step 4. Click on the Email button on the bottom action bar to email the order to the supplier from within SimpleClinic ->
add text and instructions as needed (the order details selected will be attached to the email and sent to your supplier)
-> Send Email
This is an example of the email that will be sent to the supplier:

Receive an Order
Step 5. The Received date is the date the order is delivered to you. If you are placing a retrospective order into SimpleClinic, you can enter the date the order was received.
The inventory items will now update as per the quantities on the order.

Add Expiry and Batch numbers
Step 6. Click on the product you want to add expiry date and batch number to (where it says Expiry as highlighted below) -> enter the expiry date and batch numbers -> this is automatically saved -> select the next item and continue or leave the screen.


Xero Integration
Step 7. Orders will be automatically sent to Xero, under Purchases -> Bills within 10-15 mins.
Deleted orders will be voided in Xero, if not, you can void it manually.
Orders in SimpleClinic show the wholesale cost price of the item from your inventory, not including GST. Xero will add GST to your bills as required.
See this set of articles for Xero Integration.